Thursday 28 January 2016

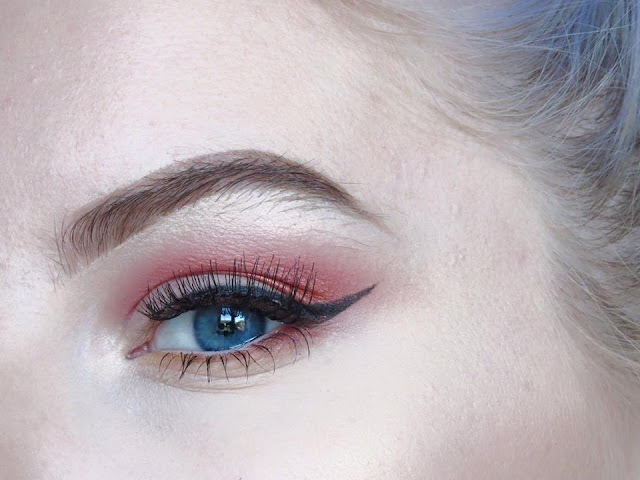
Burgundy Eye And Basic Skin Routine


Hi Guys,
Heres a quick pictorial for you!! Below, i will be showing you how i like to do my foundation, concealer and eye makeup. Using just a few products this look is all yours!

You will need:
- Your foundation of choice (i used loreal lumi magique)
- Your concealer of choice (i used collection lasting perfection concealer in #1)

- Transparent setting powder
- Eyebrow kit
- Kiko eyeshadow #137

- Kiko Smart Eyeliner #800
- Kiko Smart Liner #802
- Black liquid eyeliner, of your choice. (I used collection felt tip liner)
- False lashes (i used tanya burr date night)


Here we go...  ENJOY!!!


Start with a fresh base
I used a beauty blender to apply my foundation today
voila
Apply a generous amount of concealer under the eye and any other imperfections you may have. Blend with fingers/brush if you prefer...
Use a powder ti set your concealer in place. This helps to avoid creasing...
voila!
Using your favourite brow kit, fill in the brows...
voila!
Using this gorgeous burgundy eyeshadow, apply it to your lid only...
concentrating on the outer and inner corners first. Using a damp makeup brush pack the same colour in the centre of the lid for maximim colour payoff. 
Using the kiko smart liners, create a wing...
Add another wing with your black eyeliner. Add your lashes, mascara and you're done!!


I hope you enjoyed this pictorial.

XX

Summer Sunset Eye Look

Hi everyone!
I am back with this new colorful eye tutorial, the mix of eye shadows I chose to use for this look reminds me of a beautiful summer sunset! It's been sooooooo long since I've written a blog post so I feel a bit rusty. (forgive me)

Today i spent the majority of my morning looking at holidays online, trying to cheer myself up during this cold gloomy weather here in the UK. I came across a stunning picture of a sunset on the beach, and decided to create an eye look using the lovely warm and summery colours. Here is what i created:

(please ignore how bad my eyebrows are!! they are in desperate need of a good plucking)


If you would like to create this look for yourself, just keep on reading...

The products i used are:

- Brule (Mac)
- Coppering (Mac)
- Wet & Dry Pigment in #19 (Kiko)
- Master Precise liquid eyeliner (Maybelline)
- Vanilla Pigment (Mac)
- Tanya Burr Lashes in 'Date Night' 
- In Extreme Dimension Mascara, in black (Mac)

Step 1:
Apply Brule eyeshadow ALL over the lid to create a perfectly smooth base.
Step 2:
Using a pencil brush, apply Coppering eyeshadow through the crease. Keep the line through the crease as neat as possible and try your best not to get any on your lid. Keep building up colour by packing the colour on the lid in a tapping motion. You want the colour to be as intense as possble!

Step 3:
Using a clean fluffy blending brush, buff out the edges until evenly blended. I blended the colour out into a subtle wing so that when my eyeliner was applied it all flowed nicely.

Step 4:
Use your pencil brush again, and the same Coppering eyeshadow, apply the colour along the outer part of the lower lash line. On the inner corner, do the same thing with the yellow wet and dry pigment. I used this dry for a subtle hint of yellow.

Step 5:
Apply a bold winged liner, however long/bold you would like it. I like to use a concealer along the bottom edge of the wing to neaten it up slightly.

Step 6:
Apply Vanilla pigment from mac on the brow bone and the inner corner of the eye to brighten the look.

Step 7:
Apply your favourite mascara, pop on the lashes, and there you have it.

Simple!!

I hope you enjoyed this post!!

XX

Wednesday 27 January 2016

Forgive me

First things first guys...
I am SO sorry that my blog updates have been SO incredibly slow these past couple of weeks. Ive been suffering from impetigo, 
(disgusting i know) all over my body, and its safe to say that makeup was the last thing i wanted to be putting on my skin.
Finally after about a month and a half of scabby face its decided to F*** off.  So, all being well, I'll be back on form as of tomorrow.
I'll be doing a bright and bold makeup tutorial for you all. So keep an eye out!! Check out my instagram page for updates: @makeupbylucyw  *cough* (give me a follow) *cough*


For the time being, here is a collection of some new products that have kindly been given to me by my boyfriends incredibly generous sister. I'll be using these products in the next few blog posts...

Laura Geller Baked Eyeshadows

a
Avon Pastel Sweets Eyeshadow Palette


xx

Saturday 16 January 2016

Top 4: Favourite Instagram Accounts


Beauty bloggers never fail to inspire me to turn my beauty routine up on a daily basis. There seems to be an endless stream of incredibly makeup savvy girls adding (literal) sparkle to my Instagram feed every time i scroll. These ladies that I absolutely LOVE teach everything from the perfect contour products to the best date night lip colour. Some of these bloggers even have a small army of devoted followers hanging on to every glamorous hashtag and anxiously awaiting each tutorial. A.K.A, me. Naturally, whenever i stumble upon a new inspiring makeup guru, i obsess over every post concentrating on how she fashioned her eye brow arch that perfectly or how her bronzer has just the right summer glow. My love for these four incredible ladies just keeps on growing haha!

First of all, top of my list... the ever so lovely Desi Perkins:


Desi has a very popular instagram 
account that highlights various makeup looks and her everyday life. She creates celebrity inspired makeup tutorials, including my all time favourites of Jennifer Lopez and Kylie Jenner. LOVE HER!

Next, The incredibly talented An Knook:


An, from the Netherlands has SOOO much talent. Her flawless skin and beautiful eyes are enough to make anyone jealous. Her makeup looks are always so lovely and so precise. I need that precision in my life!

Next, a girl i have recently discovered and automatically loved... Georgia Cutts:


First of all, her ever changing hair colour was what inspired me to dye my hair silver/ ashy blonde. Although i dont pull it off as well as Georgia does :( Georgia is a makeup artist working at Mac Cosmetics from the UK, Currently at 158k followers, her instagram page is forever growing. I fully admire her. A beautiful girl.

Last but not least. Another new obsession of mine... Jamie Genevieve.


Okay so, lets just talk about her hair colour for a moment. wow. I know for sure what my next hair colour is going to be!! Jamie is also an incredibly talented makeup artist, whos highlight NEVER disappoints. Ive tried and failed to re create many of her looks before. I just dont know how she does it!!!

So there we have it guys, my four favourite instagram accounts. Give them all a follow!!

XX

Summer Wedding Makeup Ideas

Alright ladies, let’s talk beauty. Chances are you’re going to wear some sort of makeup for your wedding day... the question is, what look are going for? There are ton of different options out there! So many, in fact, that the beauty choices can be almost overwhelming.

This summer I have been asked by my cousin to do her makeup for her and her lovely bridesmaids on her big day. Ive been having a think about what makeup looks would compliment her chosen colour scheme (coral).  Your wedding colour scheme will set the tone for the entire day. Darker hues are more formal and can be considered more refined and stylish, while lighter tones are more playful and romantic. By mixing and matching different shades of the rainbow, you can achieve all sorts of different tones and settings to help set the mood for your wedding. The internet and my art student knowledge suggests that the most popular colours to be matched with coral are turquoise and grey. But, I dont think Thea (my cousin) will appreciate a turquoise eye look, so grey is the next option! As lovely as bold smokey grey eye looks are, i think for a summer wedding it may look slightly too dark. So, to compliment the coral and the grey ive chosen five warm toned coppers and browns to brighten the overall eye look... (see below)


From Left To Right: (all products are from Mac)
Da Bling, Sable, Woodwinked, Amber Lights, Coppering


You may be thinking "wheres the grey?!" well, i was thinking of using a grey shadow to do a smoked out winged eyeliner which will soften the look even more. The grey i have chosen to use is 'Smut' from Mac.
For the skin, its all about looking naturally radiant. A dewy foundation and liquid highlighter is my chosen base for this look, with a peach toned blush and a gentle bronzed contour.
Prepping your skin with a matte primer (not an illuminating one) is key, as you’ll want to create the perfect canvas for this glowing look. Since you’ll be skipping powder altogether for this look, you need something to prevent shine and oil overload.

This look from Desi Perkins is how i imagine this look will turn out...
I'll update you on how it turned out when i do the trial in a few months time! haha.
 

i hope you enjoyed this post!! xx

Saturday 2 January 2016

Kiko Haul & Swatches

The christmas and boxing day sales in kiko were wayyyyy too tempting. With up to 50% off a HUGE range of products its safe to say that I got my moneys worth.
Heres what i picked up...


For product details and swatches, keep on reading!!...


xx